No products
Categories
- Courses
- Rods
- Reels
- Lines
- Leaders and Tippets
- Wading
- Clothing
- Bags and Packs
- Accessories
- Flies
- Fly Tying
- Books & DVD
- Gift Vouchers
- On Sale
- Arcay
- Orvis
- Simms
- Smith Creek
Dubbing Loop Technique by Gerhard Laible
Published: 2016-11-17 21:36:32
Categories: Fly Tying
Dubbing-loops for fine materials require a perfect tying-thread line.
If you create a usual loop with the dubbing-twister then both threads are parallel but they are not exactly close enough to each other. The space between the threads is equivalent to the double wire strength of the dubbing twister. This is not a problem when you are using seal dubbing, seal substitute, fur-beards or other thicker materials. But if you are using fine tying materials like fibres of the Cul de Canard (CDC) feather there exists a decisive disadvantage: the fibres get out of place very easily and it is difficult to keep them in the right position. This disadvantage can be completely avoided by using my loop-technique.
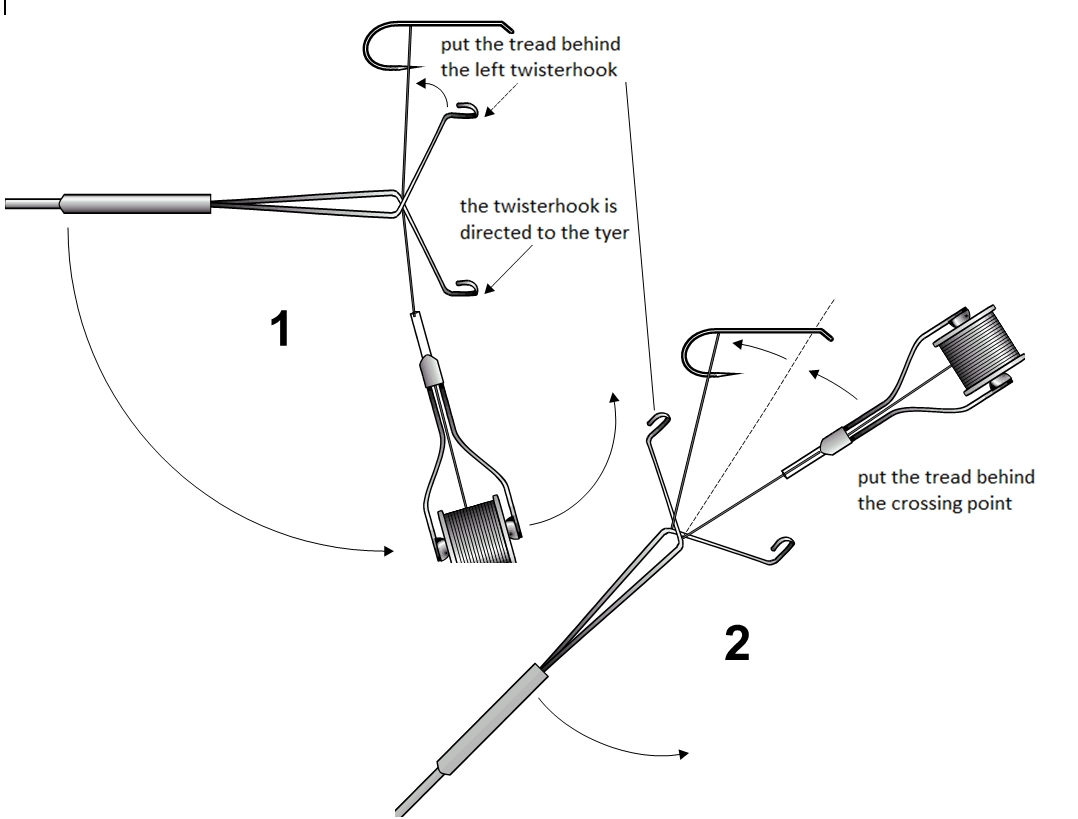
Pic. 1:
Just put the dubbing-twister with its crossing point on the hanging tying thread. Take care that the dubbing-twister is positioned in a 90 degree angle to the tying thread. The hooks of the twister should point to the body of the tier, away from the fly.
Pic. 2:
Now you turn the twister 90 degrees downwards under light pressure on the thread. At the same time you move the bobbin with the tying thread upwards. The left hook of the twister is guided behind the tying thread during moving downwards the twister and the tying thread is guided to the top between the hooks of the twister. Thus, both threads lay between the hooks of the twister. The turning of the twister and the upwards movement of the bobbin happen simultaneously in a harmonic way. Now, do not bring the tying thread over the hook-shank like you would do it with a normal loop, but bring the thread over the hook-shank from the back.

Pic. 3:
The dubbing-loop moves into the hooks of the twister by pulling down the twister. Both threads lay absolutely parallel and absolutely close to each other – inside the hooks of the twister.
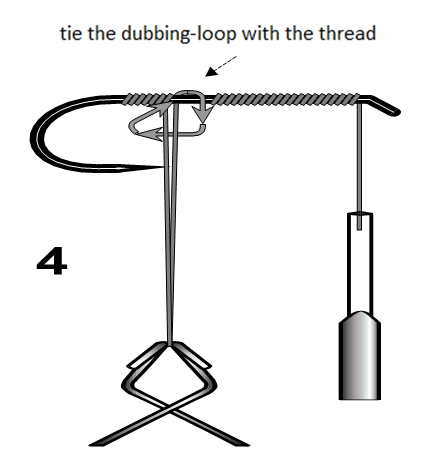
Pic. 4:
Now you bring the tying thread from the back of the hook shank to the front and lay it next to the dubbing-loop. Then you wrap the thread around the loop and move it upwards. You close the dubbing-loop on its top and the tying thread is in its normal winding position again. Now you can continue as usual.
You are able to do it a little faster after a bit of practice:
just throw your bobbin around the dubbing loop; the tying thread should be hold shortly. All this happens with your right hand during your left hand is holding the dubbing-loop under tension. The wrap around the loop is important and necessary because only like this it is guaranteed that both threads are absolutely close to each other and guided to the hook in a parallel way.

Pic. 5:
The GL-dubbing-loop is finished an ready to get filled with fine dubbing materials.


Using CDC with the Dubbing Loop by Gerhard Laible
Read more
Published: 2016-11-17 23:20:13